
이 글은 Building and Evaluating Advanced RAG 코스를 보고 정리한 글입니다.
다루는 내용:
- High Quality RAG 시스템을 만들 수 있도록 Context 를 풍부하게 가져와서 LLM 에게 전달하는 매커니즘을 소개
- Sentence window retrieval 매커니즘
- auto-merging retrieval
- 이 방식들의 시사점은 동적으로 더 일관되게 Context 를 풍부하게 제공할 수 있는 방법이라는 거임.
- Evaluation framework 를 제공해줘서 LLM 의 답변 성능을 측정하고 개선하는 작업을 반복적으로 할 수 있도록 하는 매커니즘도 소개
- 3가지 Evaluation Metric: Context Relevance, Groundeness, answer relevance
- 이것들을 LangChain 과 같은 LlamaIndex 라는 프레임워크를 통해서 배워볼거임.
1. Advanced RAG Pipeline
여기서는 기본적인 RAG Pipeline 을 만들어보고 3가지 Metric 인 Context Relevance, Groundeness, answer relevance 로 평가해볼 것.
그리고 Advanced RAG Technique 인 Senetence-window retrieval 와 Auto-merging retrieval 를 적용해보고 성능이 얼마나 개선되었는지 볼 것임.
RAG 시스템을 평가하는 Metric 에 대한 지표 설명은 다음과 같다:
- Context Relevance: 는 주어진 질문과 Retrieve 한 Context 의 연관도를 평가함.
- Groundedness 는 Context 를 가지고 작성한 Response 가 Context 를 기반으로 잘 작성되었는지를 평가함.
- Asnwer Relevacne 는 주어진 질문이 Response 와 연관이 있는지를 평가함.

먼저 Openai API 를 사용하기 위한 key 설정:
import utils

import os
import openai
openai.api_key = utils.get_openai_api_key()
다음으로는 Vector Store 에 적재할 Document 를 읽어오는 과정을 할거임. 이건 SimpleDirectoryReader 를 사용한다.
- SimpleDirectoryReader 는 llama index 라이브러리로 해당 파일에 맞는 가장 적합한 Reader 를 읽어오는 기능을 해줌.
from llama_index import SimpleDirectoryReader

documents = SimpleDirectoryReader(
    input_files=["./eBook-How-to-Build-a-Career-in-AI.pdf"]
).load_data()
Document 의 내용을 보면 다음과 같다:
print(type(documents), "\n")
print(len(documents), "\n")
print(type(documents[0]))
print(documents[0])
Document 출력 결과:
<class 'list'>

41

<class 'llama_index.schema.Document'>
Doc ID: 3e80e78b-800b-46a6-a247-ab841a09aed5
Text: PAGE 1Founder, DeepLearning.AICollected Insights from Andrew Ng
How to  Build Your Career in AIA Simple Guide
이제 Simple 하게 RAG 시스템을 만들어보자.
from llama_index import Document

document = Document(text="\n\n".join([doc.text for doc in documents]))

from llama_index import VectorStoreIndex
from llama_index import ServiceContext
from llama_index.llms import OpenAI

llm = OpenAI(model="gpt-3.5-turbo", temperature=0.1)
service_context = ServiceContext.from_defaults(
    llm=llm, embed_model="local:BAAI/bge-small-en-v1.5"
)
index = VectorStoreIndex.from_documents([document], service_context=service_context)

query_engine = index.as_query_engine()

response = query_engine.query(
    "What are steps to take when finding projects to build your experience?"
)
print(str(response))
출력 결과:
Develop a side hustle, ensure the project will help you grow technically, collaborate with good teammates, and consider if the project can serve as a stepping stone to larger projects.
다음으로 Evaluation 과정을 세팅해보자. 먼저 Evaluation 에 사용할 질문 리스트들을 만들어야함. 이 질문들을 가지고 RAG 시스템의 LLM 에게 질문을 한 이후에 답변을 받아와서 평가할거임.
평가로는 Tru 를 이용할거다.
eval_questions = []
with open('eval_questions.txt', 'r') as file:
    for line in file:
        # Remove newline character and convert to integer
        item = line.strip()
        print(item)
        eval_questions.append(item)

# You can try your own question:
new_question = "What is the right AI job for me?"
eval_questions.append(new_question)

from trulens_eval import Tru
tru = Tru()

tru.reset_database()
다음으로 우리 RAG 시스템에 사용할 query_engine 과 해당 RAG 시스템의 app_id 를 입력해서 평가를 해놓으면 나중에 대시보드를 통해 성능을 볼 수 있음. app_id 를 통해서 RAG 시스템을 구별해서 비교해볼 수 있다.
from utils import get_prebuilt_trulens_recorder

tru_recorder = get_prebuilt_trulens_recorder(query_engine, app_id="Direct Query Engine")

with tru_recorder as recording:
   for question in eval_questions:
       response = query_engine.query(question)

records, feedback = tru.get_records_and_feedback(app_ids=[])

records.head()

# launches on http://localhost:8501/
tru.run_dashboard()
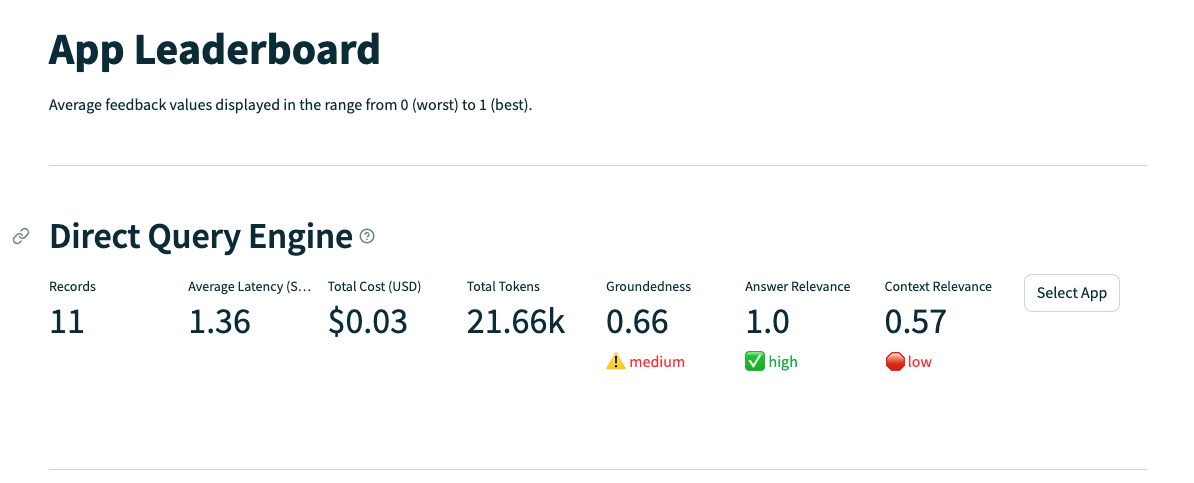
리더 보드는 이런식으로 평가된다.
- Context Relevance, Answer Relevance, Groundedness 기준으로 보면 됨. 이 값이 높을수록 좋은거임.
Sentence-window retrieval 에 대한 간략한 기법:
- 이후에 자세하게 설명하겠지만 문장 단위로 Chunking 을 해놓는 방법으로, 매칭이 되었을 때 해당 문장을 포함하고 있는 맥락으로 대체해서 Retrieve 하는 방법임.
- 정확한 문장이 포함된 매칭을 사용하는 거니까, 어떤 정보를 기반으로 확실하게 대답해야할 때 사용하면 좋은 기법이라고 생각함.
- 그러나 해당 문장이 포함된 글의 단락이 질문과도 유사할까? 라는 의문이 남는다. 그리고 단락의 범위에 대한 의문도 있다.

Sentence-window Retrieval 기법을 적용해서 평가하는 코드
from llama_index.llms import OpenAI

llm = OpenAI(model="gpt-3.5-turbo", temperature=0.1)

from utils import build_sentence_window_index

sentence_index = build_sentence_window_index(
    document,
    llm,
    embed_model="local:BAAI/bge-small-en-v1.5",
    save_dir="sentence_index"
)

from utils import get_sentence_window_query_engine

sentence_window_engine = get_sentence_window_query_engine(sentence_index)

window_response = sentence_window_engine.query(
    "how do I get started on a personal project in AI?"
)
print(str(window_response))

tru.reset_database()

tru_recorder_sentence_window = get_prebuilt_trulens_recorder(
    sentence_window_engine,
    app_id = "Sentence Window Query Engine"
)

for question in eval_questions:
    with tru_recorder_sentence_window as recording:
        response = sentence_window_engine.query(question)
        print(question)
        print(str(response))

tru.get_leaderboard(app_ids=[])

# launches on http://localhost:8501/
tru.run_dashboard()
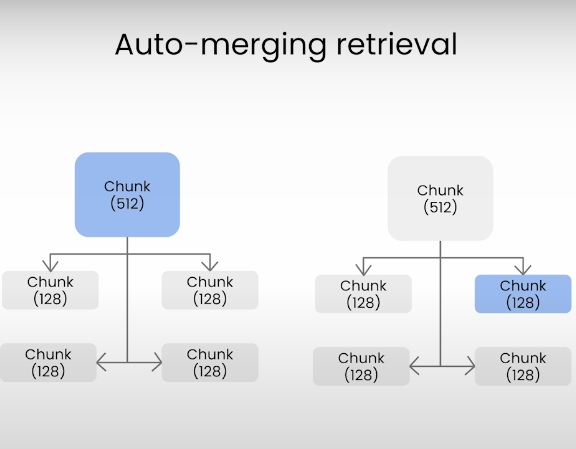
이번에는 Auto-merging retrieval 코드에 대해 살펴보자.
이는 Parent Chunk 와 Child Chunk 가 계층으로 되어있을 때, Child Chunk 가 질문과 매칭되면 이걸 Parent Chunk 로 교체하는 방법이다.
Parent Chunk 가 아무래도 맥락이 더 많으니 이 방법을 사용함. 결국 더 큰 맥락을 제공해주는 건 좋지만 글의 단락을 명확하게 잘 끊어주는게 좋을 것 같음.
하나의 Parent Chunk 는 글에서 하나의 주제만 잘 담기도록.
Auto-merging retrieval 을 적용해서 평가하는 코드는 다음과 같다:
from utils import build_automerging_index

automerging_index = build_automerging_index(
    documents,
    llm,
    embed_model="local:BAAI/bge-small-en-v1.5",
    save_dir="merging_index"
)

from utils import get_automerging_query_engine

automerging_query_engine = get_automerging_query_engine(
    automerging_index,
)

auto_merging_response = automerging_query_engine.query(
    "How do I build a portfolio of AI projects?"
)

print(str(auto_merging_response))

tru.reset_database()

tru_recorder_automerging = get_prebuilt_trulens_recorder(automerging_query_engine, app_id="Automerging Query Engine")

for question in eval_questions:
    with tru_recorder_automerging as recording:
        response = automerging_query_engine.query(question)
        print(question)
        print(response)

tru.get_leaderboard(app_ids=[])

# launches on http://localhost:8501/
tru.run_dashboard()
2. RAG Triad of Metrics
이전에 간략하게 살펴봤던 RAG 어플리케이션을 평가하는 3요소에 대해서 조금 더 자세하게 살펴보자:
- Context Relevance
- Answer Relevance
- Groundedness
먼저, 이런 Evaluation 은 TrueLens 라는 라이브러리를 이용해서 할 수 있다.
여기서 제공해주는 Feedback function 을 통해서 평가할 수 있음.
Feedback function 을 만드는 방법에 대해서는 이따가 자세히 살펴보고 다시 돌아와서 RAG 의 3요소에 대해 보자.
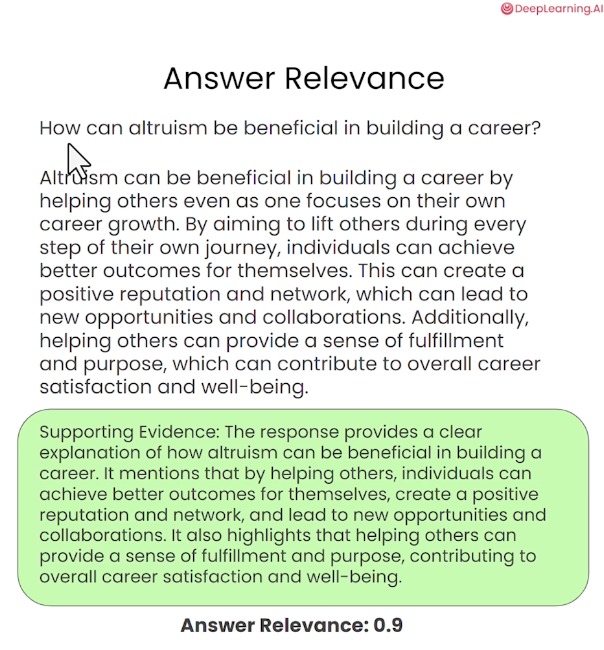
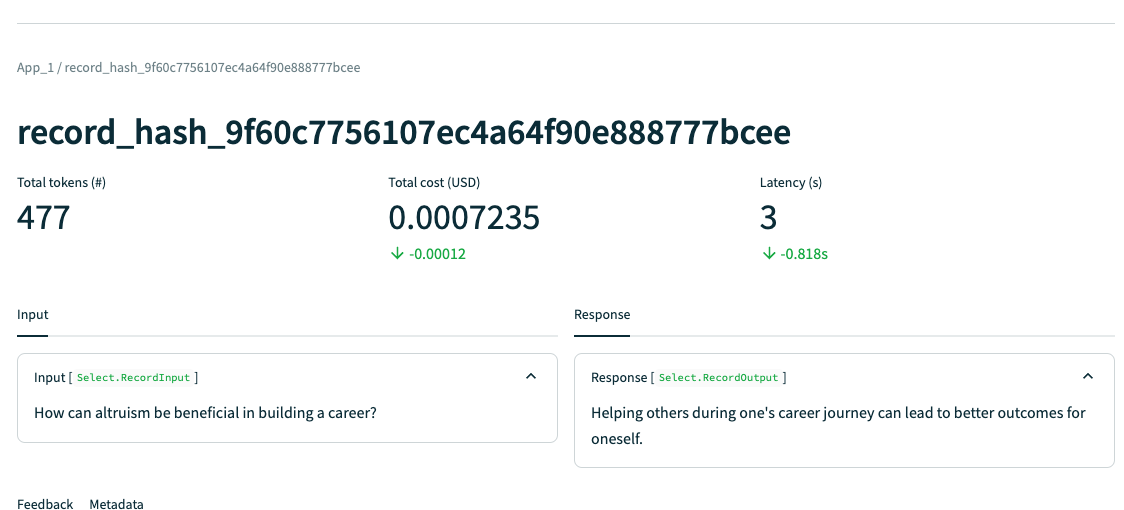
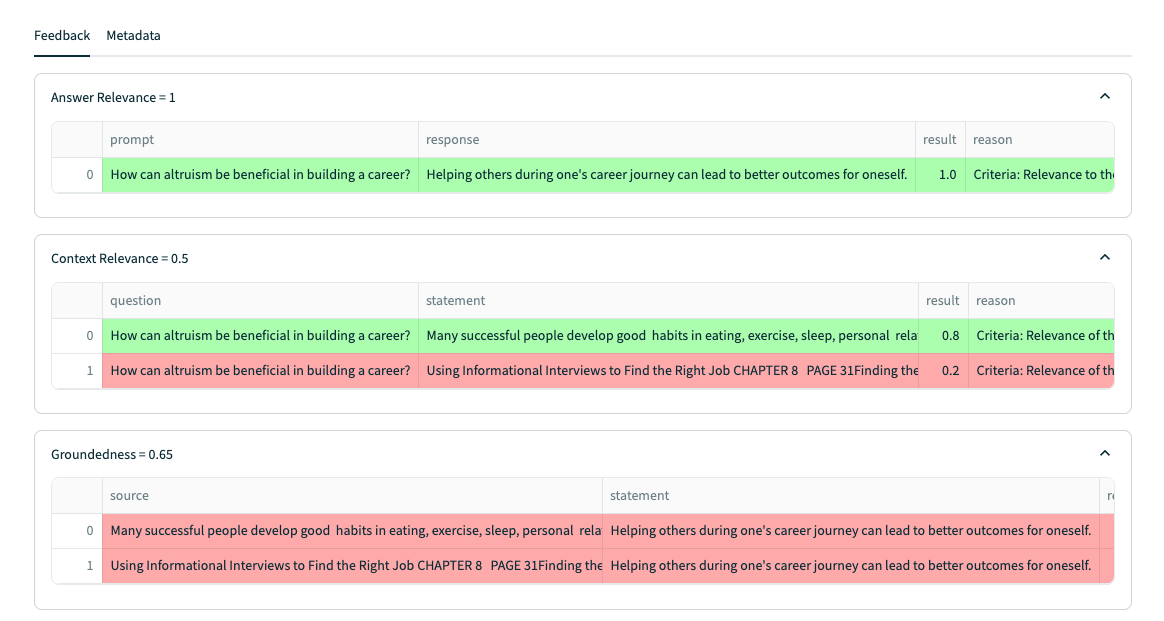
Answer Relevance:
- 주어진 질문과 답변의 유사성을 평가하는 지표이다.
- 예시를 보면 다음과 같은데 질문인 "How can altruism be beneficial in building a career?" 라는 질문에 대해서 답변은 괜찮게 작성되어 있음. "이타주의는 커리어에 도움이 됨. 사람들을 도와주면서 자신의 능력도 발전시킬 수 있고, 네트워크도 쌓을 수 있고, 평판도 좋아진다는 등"
- 이런식으로 평가를 결정짓는 요소로는 답변과의 직접적인 관련성을 가지고 평가하게 된다. 그러니까 동문서답을 하지 않는지를 가지고 평가를 하게 되는거지.
- Truelens 를 이용하게 되면 Answer Relevance 에 대한 Score 점수와 함께, Supporting Evidence 라는 텍스트를 제공받게 된다. Score 점수는 높을수록 좋다고 알면 되고, Supporting Evidence 는 이 점수가 나오게 된 이유에 대해서 설명을 해주는 거임.
- 평가는 LLM 이 하게된다.
나머지 요소인 Context Relevance 와 Groundedness 또한 별반 다를 게 없음. 결국 평가의 원리는 "직접적인 관련성" 이다.
이제 다음인 Feedback function 에 대해 살펴보자면 이거는 질문과, LLM 이 답변해낸 응답과, 응답을 만들어내기 위해 사용했던 Intermediate results 를 참고해서 Scoring 을 제공해주는 역할을 한다.
Feedback Function 의 구조는 이런식으로 되어있음.
- provider 는 Feedback 을 수행할 LLM 을 말한다.
- name 은 Feedback function 의 이름을 말한다. Feedback function 은 다양하게 넣을 수 있음.
- on_input() 은 주어진 질문을 말한다.
- on_output() 은 질문에 대한 응답을 말한다.
- (여기에는 Intermediate results 가 없지만 이것도 필요하면 넣어줄 수 있다.)
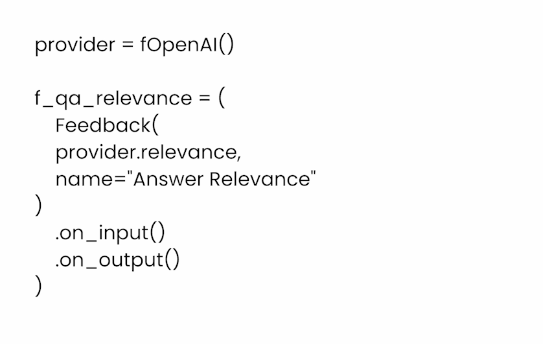
Answer Relevance 에 대한 Feedback function 을 만드는 코드를 보면 다음과 같다:
import nest_asyncio

nest_asyncio.apply()

from trulens_eval import OpenAI as fOpenAI

provider = fOpenAI()

from trulens_eval import TruLlama

context_selection = TruLlama.select_source_nodes().node.text

import numpy as np

from trulens_eval import Feedback

f_qa_relevance = Feedback(
    provider.relevance_with_cot_reasons,
    name="Answer Relevance"
).on_input_output()
Context Relevance (주어진 질문과 Context 에 대한 연관성) 에 대한 Feedback function 을 만드는 코드는 다음과 같다:
from trulens_eval import TruLlama

// Context Selection 에 Vector Store 에서 Retrieve 된 내용이 담길거임.
context_selection = TruLlama.select_source_nodes().node.text

import numpy as np

f_qs_relevance = (
    Feedback(provider.qs_relevance,
             name="Context Relevance")
    .on_input()
    .on(context_selection)
    .aggregate(np.mean)
)

import numpy as np

f_qs_relevance = (
    Feedback(provider.qs_relevance_with_cot_reasons,
             name="Context Relevance")
    .on_input()
    .on(context_selection)
    .aggregate(np.mean)
)
Groundedness (Context 와 응답의 관련성을 평가하는 척도) 에 대한 Feedback function 을 만드는 코드는 다음과 같다:
from trulens_eval.feedback import Groundedness

grounded = Groundedness(groundedness_provider=provider)

f_groundedness = (
    Feedback(grounded.groundedness_measure_with_cot_reasons,
             name="Groundedness"
            )
    .on(context_selection)
    .on_output()
    .aggregate(grounded.grounded_statements_aggregator)
)
다음으로는 이렇게 Feedback functin 을 사용해서 우리가 만드는 RAG 시스템을 어떻게 Production Ready 상태로 만드는 과정에 대해서 배워보자.
먼저 간단한 RAG 시스템을 만들어보고 이런 Feedback function 들을 적용해서 평가 점수를 얻어본 후 이 점수를 개선한다고 생각하고 행동하면 됨.
자주 만나는 문제는 RAG 시스템에서 Context 를 뽑아내는 부분일거임. Context Relevance 문제를 해결하는 관점에서 접근하는게 좋다.
더 좋은 컨택스트는 더 나은 답변을 생성할것이므로 결과적으로 3가지 지표 모두 좋아질 확률이 있음.
더 좋은 Context 를 만들기 위해 만나는 과제들은 Context 가 너무 짧아도 좋지 않고, 너무 길어도 좋지 않다는 거임.
추가로 질문과 관련없는 Context 가 들어가게 만들면 안된다는 점을 알아야한다.
다음으로는 Feedback function 을 구현하는 방법에 대해서 알아보자.
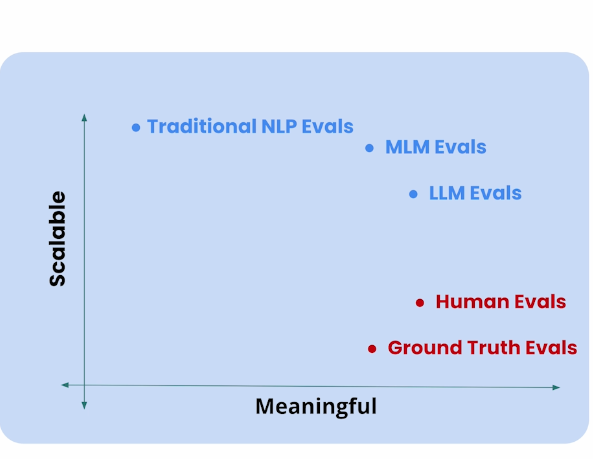
Feedback function 에서 중요한 척도는 Scalability 와 Meaningfulness 임. Human 이 평가하면 가장 좋겠지만 확장성이 떨어진다.
여기를 보면 LLM 이 답변하는 것이 가장 좋아보임. 인간에 비해 크게 떨어지지도 않으면서 확장성 있는 솔루션이니.
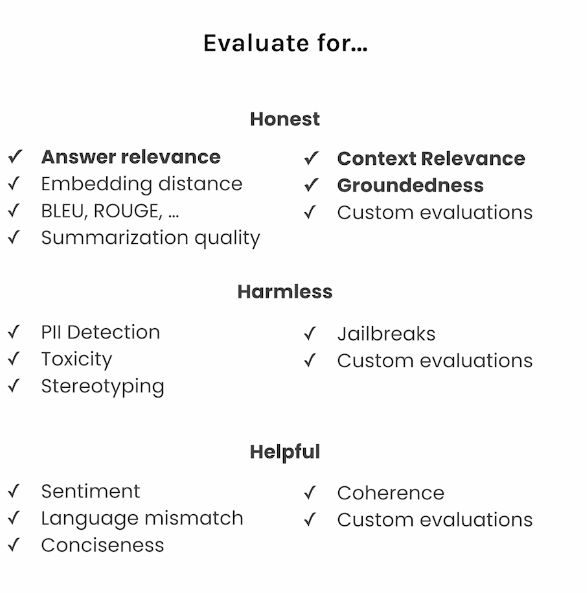
다음으로 Truelens 에서 제공해주는 Evaluation Metric 들은 우리가 살펴본 Answer Relevance, Context Relevance, Groundendness 뿐 아니라 다양하게 있음.
어플리케이션에 맞게 각 지표들을 잘 사용하는게 중요할듯하다.
LlamaIndex 에서는 Truelens 의 평가를 좀 더 쉽게 사용하기 위해서 TruLlama 라는 Intergarion Solution 을 지원한다. (LangChain 도 지원함.)
기본적으로 LLM 어플리케이션은 답변을 생성해 나가는 과정이 복잡함. Chain 으로 이어져 있기도 하고, 여러가지 Task 도 있음 (e.g Planning, Retrieval 등)
그래서 Intermedia step 같은 경우는 평가하기 힘든데, 이런 통합된 솔루션을 이용한다면 쉽게 LLM 어플리케이션을 평가해서 Production 상태로 만들 수 있을거임.
TruLlama 사용 방법은 다음과 같다:
from trulens_eval import TruLlama
from trulens_eval import FeedbackMode

tru_recorder = TruLlama(
    sentence_window_engine,
    app_id="App_1",
    feedbacks=[
        f_qa_relevance,
        f_qs_relevance,
        f_groundedness
    ]
)

eval_questions = []
with open('eval_questions.txt', 'r') as file:
    for line in file:
        # Remove newline character and convert to integer
        item = line.strip()
        eval_questions.append(item)

for question in eval_questions:
    with tru_recorder as recording:
        sentence_window_engine.query(question)

records, feedback = tru.get_records_and_feedback(app_ids=[])

# 이렇게 결과 지표에 대해 보거나
records.head()

# Pandas 를 사용해서 보거나
import pandas as pd
pd.set_option("display.max_colwidth", None)
records[["input", "output"] + feedback]

# 대시보드를 이용해서 볼 수도 있다.
tru.run_dashboard()
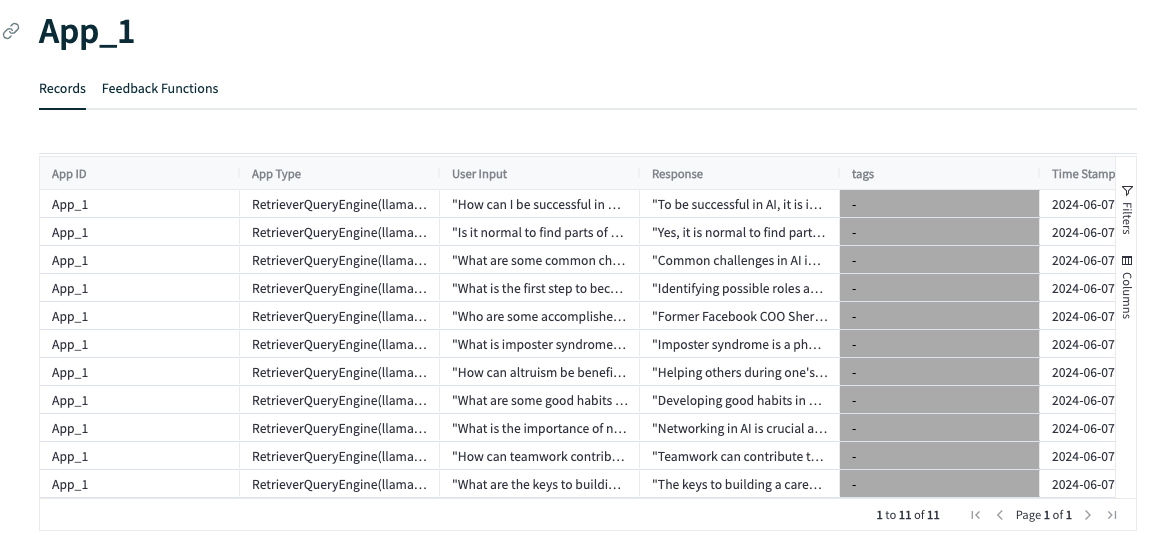
대시보드가 정말 매력적임. 이렇게 한 눈에 볼 수도 있고, Select App 을 선택하면 자세하게 볼 수도 있다.

각 평가 질문마다 하나씩 자세하게 볼 수 있음.

그리고 이렇게 하나를 클릭하면 Latency, Total cost, Tokens, Timeline 에 대해서, 피드백에 대해서 볼 수 있다.

3. Senetence-window retrieval
여기서는 Sentence-window retrieval 이 어떻게 동작하는지 내부 매커니즘에 대해서 다뤄보고, 이를 이용해서 RAG 어플리케이션을 점진적으로 발전 시키는 과정에 대해 알아볼거임.
Sentence-window retrieval 기법은 Document 에 있는 Content 들을 문장(Sentence) 단위로 잘라서 임베딩해서 Vector Store 에 적재한 후, 질문이 들어왔을 때 문장을 찾은 후 문장의 앞뒤에 있는 추가 문장을 합쳐서 Context 를 만들어서 Prompt 에 추가하는 기법임.
기본적으로 Chunking 을 할 때는 큰 텍스트를 Chunking 하는 것보다 작게 잘라서 Chunking 하는게 더 효과적이라고 함.
작은 단위의 Chunking 이 더 높은 정확도와 더 빠른 검색이 가능하게 한다. 이건 Embedding 의 특성상 큰 단위의 텍스트 보다는 작은 단위의 텍스트가 더 명확하게 의미를 포착할 수 있기 때문이라고 함.
큰 단위의 Chunking 은 전체 맥락을 가지게 만들 수 있어서 RAG 기법에서 Retrieve 후 Synthesis 과정이 더 쉬워진다는 특징이 있다.
이제 Senetence-window retrieval 기법에 대해 알아보기 위해 주요 컴포넌트를 살펴보자.
먼저 실습에 사용할 OpenAI 모델을 만들고 Data 를 가져오자.
import utils

import os
import openai
openai.api_key = utils.get_openai_api_key()

from llama_index import SimpleDirectoryReader

documents = SimpleDirectoryReader(
    input_files=["./eBook-How-to-Build-a-Career-in-AI.pdf"]
).load_data()

print(type(documents), "\n")
print(len(documents), "\n")
print(type(documents[0]))
print(documents[0])
Document 출력 결과:
<class 'list'>

41

<class 'llama_index.schema.Document'>
Doc ID: 7be66c70-8b3e-4d89-8130-fcfe4b3c7c8b
Text: PAGE 1Founder, DeepLearning.AICollected Insights from Andrew Ng
How to  Build Your Career in AIA Simple Guide
List 표현인 Document 들을 하나로 합쳐서 Sentence 로 자르자:
여기서 SentenceWindowNodeParser 컴포넌트가 등장한다. 이 컴포넌트는 Document 안의 Text 를 문장 단위로 자른 후, Metadata 에 문장의 앞뒤 맥락이 포함된 Context 가 들어가도록 만든다.
그래서 문장이 Retrieve 된 이후에 Metadata 를 참고해서 해당 Context 로 교체하는 식으로 Senetence-window retrieval 가 동작할거다.
아래의 예시와 출력을 보면 더 이해하기 쉬울 것.
from llama_index import Document

document = Document(text="\n\n".join([doc.text for doc in documents]))

from llama_index.node_parser import SentenceWindowNodeParser

# create the sentence window node parser w/ default settings
node_parser = SentenceWindowNodeParser.from_defaults(
    window_size=3,
    window_metadata_key="window",
    original_text_metadata_key="original_text",
)

text = "hello. how are you? I am fine!  "

nodes = node_parser.get_nodes_from_documents([Document(text=text)])

print([x.text for x in nodes])
print(nodes[1].metadata["window"])
출력 결과:
['hello. ', 'how are you? ', 'I am fine!  ']
hello.  how are you?  I am fine!
다음은 LLM 과 Embedding Model 과 이 Parser 를 합친 Wrapper 클래스인 Service Context 가 있고, Vector Store 에 이 Servic Conext 와 Document 를 인자로 주게되면 알아서 Senetence-window retrieval 기법을 사용할 수 있다.
이후에 소개하겠지만 Vector Store 에서 몇가지 파라미터와 후처리를 담당할 Post Processor 만 설정한다면 질문이 주어졌을 때 Vector Store 에서 Retrieve 하고, 해당 내용을 컨택스트로 사용해서 답변을 작성하도록 하는 RAG 시스템이 만들어진다.
아래는 VectorStoreIndex 를 만들고 이를 Local Disk 에 저장하고 불러오는 코드임.
from llama_index.llms import OpenAI

llm = OpenAI(model="gpt-3.5-turbo", temperature=0.1)

from llama_index import ServiceContext

sentence_context = ServiceContext.from_defaults(
    llm=llm,
    embed_model="local:BAAI/bge-small-en-v1.5",
    # embed_model="local:BAAI/bge-large-en-v1.5"
    node_parser=node_parser,
)

from llama_index import VectorStoreIndex

sentence_index = VectorStoreIndex.from_documents(
    [document], service_context=sentence_context
)

sentence_index.storage_context.persist(persist_dir="./sentence_index")

# This block of code is optional to check
# if an index file exist, then it will load it
# if not, it will rebuild it

import os
from llama_index import VectorStoreIndex, StorageContext, load_index_from_storage
from llama_index import load_index_from_storage

if not os.path.exists("./sentence_index"):
    sentence_index = VectorStoreIndex.from_documents(
        [document], service_context=sentence_context
    )

    sentence_index.storage_context.persist(persist_dir="./sentence_index")
else:
    sentence_index = load_index_from_storage(
        StorageContext.from_defaults(persist_dir="./sentence_index"),
        service_context=sentence_context
    )
다음으로는 MetadataReplacementPostProcessor 에 대해서 살펴보자.
이 클래스는 알겠지만 Senetence-window retrieval 기법에서 문장에 매칭된 Chunk 를 이제 문장과 문장 앞뒤의 추가 문장을 합쳐서 Context 로 교체 하게 만드는 Post Processor 이다.
다음 예시를 보자.
from llama_index.indices.postprocessor import MetadataReplacementPostProcessor

postproc = MetadataReplacementPostProcessor(
    target_metadata_key="window"
)

from llama_index.schema import NodeWithScore
from copy import deepcopy

scored_nodes = [NodeWithScore(node=x, score=1.0) for x in nodes]
nodes_old = [deepcopy(n) for n in nodes]

replaced_nodes = postproc.postprocess_nodes(scored_nodes)

print(nodes_old[1].text)
print(replaced_nodes[1].text)
출력 결과:
'foo bar. '
hello.  foo bar.  cat dog.  mouse
다음으로는 SentenceTransformerRerank Post Processor 에 대해서 살펴보자.
ReRank 프로세스는 Vector Store 에서 검색한 컨텐츠를 다시 Rescoring 을 매기고 필터링해서 가장 연관있는 Context 를 가져오는 기법이다.
아래 예시를 보면 "This is a dog" 이라는 Chunk 가 "This is a cat" 이라는 Chunk 보다 스코어링 점수가 더 낮다. 하지만 Rerank 매커
니즘에 의해서 해당 Context 가 최종적으로 더 스코어링이 높게 매겨짐.
from llama_index.indices.postprocessor import SentenceTransformerRerank

# BAAI/bge-reranker-base
# link: https://huggingface.co/BAAI/bge-reranker-base
rerank = SentenceTransformerRerank(
    top_n=2, model="BAAI/bge-reranker-base"
)

from llama_index import QueryBundle
from llama_index.schema import TextNode, NodeWithScore

query = QueryBundle("I want a dog.")

scored_nodes = [
    NodeWithScore(node=TextNode(text="This is a cat"), score=0.6),
    NodeWithScore(node=TextNode(text="This is a dog"), score=0.4),
]

reranked_nodes = rerank.postprocess_nodes(
    scored_nodes, query_bundle=query
)

print([(x.text, x.score) for x in reranked_nodes])
출력 결과:
[('This is a dog', 0.9182743), ('This is a cat', 0.001404078)]
다음 예시는 이제 QueryEnginer 으로 만드는 예시다. 최종적인 RAG 시스템은 이 QueryEngine 이 사용자 질문을 받는 인터페이스 역할을 하게 되고, 답변도 이 컴포넌트가 마지막 관문임.
보면 QueryEngine 을 만들 때 뽑을 문서의 개수인 top k 를 지정하고, post processor 를 매개변수로 지정할 수 있다.
sentence_window_engine = sentence_index.as_query_engine(
    similarity_top_k=6, node_postprocessors=[postproc, rerank]
)

window_response = sentence_window_engine.query(
    "What are the keys to building a career in AI?"
)

from llama_index.response.notebook_utils import display_response

display_response(window_response)
출력 결과:
Final Response: The keys to building a career in AI involve learning foundational technical skills, working on projects, finding a job, and being part of a supportive community.
다음은 이 QueryEngine 이 내부적으로 어떻게 구성되어 있는지 설명해주는 코드임.
우리가 이전에 살펴본 코드가 모두 통합되어 있다고 알면 된다.
import os
from llama_index import ServiceContext, VectorStoreIndex, StorageContext
from llama_index.node_parser import SentenceWindowNodeParser
from llama_index.indices.postprocessor import MetadataReplacementPostProcessor
from llama_index.indices.postprocessor import SentenceTransformerRerank
from llama_index import load_index_from_storage


def build_sentence_window_index(
    documents,
    llm,
    embed_model="local:BAAI/bge-small-en-v1.5",
    sentence_window_size=3,
    save_dir="sentence_index",
):
    # create the sentence window node parser w/ default settings
    node_parser = SentenceWindowNodeParser.from_defaults(
        window_size=sentence_window_size,
        window_metadata_key="window",
        original_text_metadata_key="original_text",
    )
    sentence_context = ServiceContext.from_defaults(
        llm=llm,
        embed_model=embed_model,
        node_parser=node_parser,
    )
    if not os.path.exists(save_dir):
        sentence_index = VectorStoreIndex.from_documents(
            documents, service_context=sentence_context
        )
        sentence_index.storage_context.persist(persist_dir=save_dir)
    else:
        sentence_index = load_index_from_storage(
            StorageContext.from_defaults(persist_dir=save_dir),
            service_context=sentence_context,
        )

    return sentence_index


def get_sentence_window_query_engine(
    sentence_index, similarity_top_k=6, rerank_top_n=2
):
    # define postprocessors
    postproc = MetadataReplacementPostProcessor(target_metadata_key="window")
    rerank = SentenceTransformerRerank(
        top_n=rerank_top_n, model="BAAI/bge-reranker-base"
    )

    sentence_window_engine = sentence_index.as_query_engine(
        similarity_top_k=similarity_top_k, node_postprocessors=[postproc, rerank]
    )
    return sentence_window_engine

from llama_index.llms import OpenAI

index = build_sentence_window_index(
    [document],
    llm=OpenAI(model="gpt-3.5-turbo", temperature=0.1),
    save_dir="./sentence_index",
)

query_engine = get_sentence_window_query_engine(index, similarity_top_k=6)
다음으로는 이제 RAT Triad Metric 을 이용해서 점진적으로 개선하는 코드임.
목표는 Context Relevance 부터 개선하겠다고 생각하고 접근하면 됨.
Sentence Window Count 를 1부터 3 그리고 5까지 올려보면서 지표가 어떻게 나오는지를 보는 것.
적절한 사이즈가 있을거임. window 사이즈가 너무 크게 되면 부적절한 맥락이 포함될 수 있다.
먼저 Sentence window count 를 1로 테스트 하는 코드부터 보자.
eval_questions = []
with open('generated_questions.text', 'r') as file:
    for line in file:
        # Remove newline character and convert to integer
        item = line.strip()
        eval_questions.append(item)

from trulens_eval import Tru

def run_evals(eval_questions, tru_recorder, query_engine):
    for question in eval_questions:
        with tru_recorder as recording:
            response = query_engine.query(question)

from utils import get_prebuilt_trulens_recorder

from trulens_eval import Tru

Tru().reset_database()

sentence_index_1 = build_sentence_window_index(
    documents,
    llm=OpenAI(model="gpt-3.5-turbo", temperature=0.1),
    embed_model="local:BAAI/bge-small-en-v1.5",
    sentence_window_size=1,
    save_dir="sentence_index_1",
)

sentence_window_engine_1 = get_sentence_window_query_engine(
    sentence_index_1
)

tru_recorder_1 = get_prebuilt_trulens_recorder(
    sentence_window_engine_1,
    app_id='sentence window engine 1'
)

run_evals(eval_questions, tru_recorder_1, sentence_window_engine_1)

Tru().run_dashboard()
다음은 Sentence window count 를 3으로 올려서 결과를 비교해보자.
sentence_index_3 = build_sentence_window_index(
    documents,
    llm=OpenAI(model="gpt-3.5-turbo", temperature=0.1),
    embed_model="local:BAAI/bge-small-en-v1.5",
    sentence_window_size=3,
    save_dir="sentence_index_3",
)
sentence_window_engine_3 = get_sentence_window_query_engine(
    sentence_index_3
)

tru_recorder_3 = get_prebuilt_trulens_recorder(
    sentence_window_engine_3,
    app_id='sentence window engine 3'
)

run_evals(eval_questions, tru_recorder_3, sentence_window_engine_3)

Tru().run_dashboard()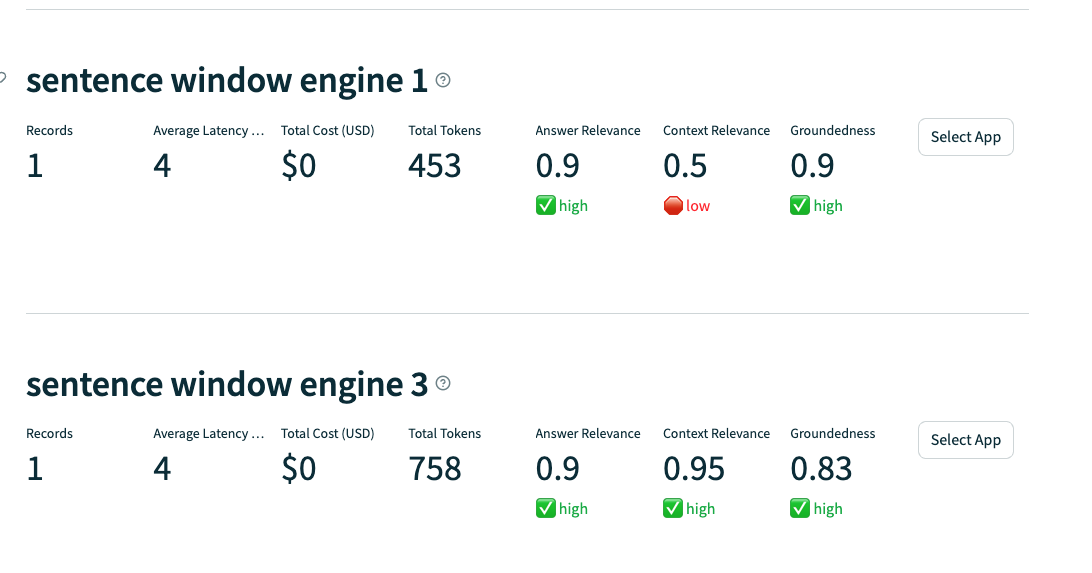
4. Auto-merging retrieval
여기서는 Auto-merging retrieval 이 어떻게 동작하는지, 그리고 이 기법을 점진적으로 개선하는 방법에 대해서 살펴봄.
Sentence-window retrieval 섹션에서 살펴본 방식과 비슷하다.
가장 기본적인 Basic Rag 시스템의 문제점인 작은 Chunk 로 인한 Context 부재와 Chunk 간의 순서를 알 수 없다는 문제점을 해결하기 위해서 Auto-merging retrieval 를 사용할 수 있음.
Auto-merging retrieval 는 Chunk 를 계층식으로 구성해놓고, 작은 Chunk 가 매칭되고 이게 일정 threshold 를 넘으면 Parent Chunk 로 대체하게 만드는 기술임.
Auto-merging retrieval 를 이해하기 위해서는 HierarchicalNodeParser 에 대해서 알아야한다.
HierarchicalNodeParser 는 Document 를 Chunk 계층별로 분리하는 역할을 해준다.
from llama_index.node_parser import HierarchicalNodeParser

# create the hierarchical node parser w/ default settings
node_parser = HierarchicalNodeParser.from_defaults(
    chunk_sizes=[2048, 512, 128]
)

nodes = node_parser.get_nodes_from_documents([document])

from llama_index.node_parser import get_leaf_nodes

leaf_nodes = get_leaf_nodes(nodes)

nodes_by_id = {node.node_id: node for node in nodes}

parent_node = nodes_by_id[leaf_nodes[30].parent_node.node_id]

print(leaf_nodes[30].text)
print(parent_node.text)
출력 결과로 보면 다음과 같음. leaf 노드보다는 parent 노드의 텍스트가 훨씬 많고 이를 포함한다.
But this became less important as numerical linear algebra libraries matured.
Deep learning is still an emerging technology, so when you train a neural network and the
optimization algorithm struggles to converge, understanding the math behind gradient
descent, momentum, and the Adam  optimization algorithm will help you make better decisions.
Similarly, if your neural network does something funny — say, it makes bad predictions on
images of a certain resolution, but not others — understanding the math behind neural network
architectures puts you in a better position to figure out what to do.
Of course, I also encourage learning driven by curiosity.
PAGE 12Should You
Learn Math to
Get a Job in AI? CHAPTER 3
LEARNING
PAGE 13Should you Learn Math to Get a Job in AI? CHAPTER 3
Is math a foundational skill for AI? It’s always nice to know more math! But there’s so much to
learn that, realistically, it’s necessary to prioritize. Here’s how you might go about strengthening
your math background.
To figure out what’s important to know, I find it useful to ask what you need to know to make
the decisions required for the work you want to do. At DeepLearning.AI, we frequently ask,
“What does someone need to know to accomplish their goals?” The goal might be building a
machine learning model, architecting a system, or passing a job interview.
Understanding the math behind algorithms you use is often helpful, since it enables you to
debug them. But the depth of knowledge that’s useful changes over time. As machine learning
techniques mature and become more reliable and turnkey, they require less debugging, and a
shallower understanding of the math involved may be sufficient to make them work.
For instance, in an earlier era of machine learning, linear algebra libraries for solving linear
systems of equations (for linear regression) were immature. I had to understand how these
libraries worked so I could choose among different libraries and avoid numerical roundoff
pitfalls. But this became less important as numerical linear algebra libraries matured.
Deep learning is still an emerging technology, so when you train a neural network and the
optimization algorithm struggles to converge, understanding the math behind gradient
descent, momentum, and the Adam optimization algorithm will help you make better decisions.
Similarly, if your neural network does something funny — say, it makes bad predictions on
images of a certain resolution, but not others — understanding the math behind neural network
architectures puts you in a better position to figure out what to do.
Of course, I also encourage learning driven by curiosity. If something interests you, go ahead
and learn it regardless of how useful it might turn out to be! Maybe this will lead to a creative
spark or technical breakthrough.How much math do you need to know to be a machine learning engineer?
다음은 Auto-merging retrieval 을 QueryEngine 으로 만들기 이전 과정에 대해 코드로 보자.
이것도 ServiceContext 라는 Wrapper 클래스를 VectorStoreIndex 에 넣고, leadNode 를 넣으면 VectorStoreIndex 를 만들 수 있다.
보면 StorageContext 도 같이 넣는 걸 볼 수 있음.
from llama_index.llms import OpenAI

llm = OpenAI(model="gpt-3.5-turbo", temperature=0.1)

from llama_index import ServiceContext

auto_merging_context = ServiceContext.from_defaults(
    llm=llm,
    embed_model="local:BAAI/bge-small-en-v1.5",
    node_parser=node_parser,
)

from llama_index import VectorStoreIndex, StorageContext

storage_context = StorageContext.from_defaults()
storage_context.docstore.add_documents(nodes)

automerging_index = VectorStoreIndex(
    leaf_nodes, storage_context=storage_context, service_context=auto_merging_context
)

automerging_index.storage_context.persist(persist_dir="./merging_index")

# This block of code is optional to check
# if an index file exist, then it will load it
# if not, it will rebuild it

import os
from llama_index import VectorStoreIndex, StorageContext, load_index_from_storage
from llama_index import load_index_from_storage

if not os.path.exists("./merging_index"):
    storage_context = StorageContext.from_defaults()
    storage_context.docstore.add_documents(nodes)

    automerging_index = VectorStoreIndex(
            leaf_nodes,
            storage_context=storage_context,
            service_context=auto_merging_context
        )

    automerging_index.storage_context.persist(persist_dir="./merging_index")
else:
    automerging_index = load_index_from_storage(
        StorageContext.from_defaults(persist_dir="./merging_index"),
        service_context=auto_merging_context
    )
Auto-merge Retriever 도 Rerank 와 같이 사용해서 QueryEngine 으로 만들 수 있음.
from llama_index.indices.postprocessor import SentenceTransformerRerank
from llama_index.retrievers import AutoMergingRetriever
from llama_index.query_engine import RetrieverQueryEngine

automerging_retriever = automerging_index.as_retriever(
    similarity_top_k=12
)

retriever = AutoMergingRetriever(
    automerging_retriever,
    automerging_index.storage_context,
    verbose=True
)

rerank = SentenceTransformerRerank(top_n=6, model="BAAI/bge-reranker-base")

auto_merging_engine = RetrieverQueryEngine.from_args(
    automerging_retriever, node_postprocessors=[rerank]
)
내부 코드는 이렇게 될 것:
import os

from llama_index import (
    ServiceContext,
    StorageContext,
    VectorStoreIndex,
    load_index_from_storage,
)
from llama_index.node_parser import HierarchicalNodeParser
from llama_index.node_parser import get_leaf_nodes
from llama_index import StorageContext, load_index_from_storage
from llama_index.retrievers import AutoMergingRetriever
from llama_index.indices.postprocessor import SentenceTransformerRerank
from llama_index.query_engine import RetrieverQueryEngine


def build_automerging_index(
    documents,
    llm,
    embed_model="local:BAAI/bge-small-en-v1.5",
    save_dir="merging_index",
    chunk_sizes=None,
):
    chunk_sizes = chunk_sizes or [2048, 512, 128]
    node_parser = HierarchicalNodeParser.from_defaults(chunk_sizes=chunk_sizes)
    nodes = node_parser.get_nodes_from_documents(documents)
    leaf_nodes = get_leaf_nodes(nodes)
    merging_context = ServiceContext.from_defaults(
        llm=llm,
        embed_model=embed_model,
    )
    storage_context = StorageContext.from_defaults()
    storage_context.docstore.add_documents(nodes)

    if not os.path.exists(save_dir):
        automerging_index = VectorStoreIndex(
            leaf_nodes, storage_context=storage_context, service_context=merging_context
        )
        automerging_index.storage_context.persist(persist_dir=save_dir)
    else:
        automerging_index = load_index_from_storage(
            StorageContext.from_defaults(persist_dir=save_dir),
            service_context=merging_context,
        )
    return automerging_index


def get_automerging_query_engine(
    automerging_index,
    similarity_top_k=12,
    rerank_top_n=6,
):
    base_retriever = automerging_index.as_retriever(similarity_top_k=similarity_top_k)
    retriever = AutoMergingRetriever(
        base_retriever, automerging_index.storage_context, verbose=True
    )
    rerank = SentenceTransformerRerank(
        top_n=rerank_top_n, model="BAAI/bge-reranker-base"
    )
    auto_merging_engine = RetrieverQueryEngine.from_args(
        retriever, node_postprocessors=[rerank]
    )
    return auto_merging_engine

from llama_index.llms import OpenAI

index = build_automerging_index(
    [document],
    llm=OpenAI(model="gpt-3.5-turbo", temperature=0.1),
    save_dir="./merging_index",
)

query_engine = get_automerging_query_engine(index, similarity_top_k=6)
Auto-merge Retriever 을 이용해서 계선하는 코드는 Chunk 계층 레이어 수를 몇개로 줄 지, Chunk 크기는 얼마로 할 지에 따라 달라짐. 그래서 이걸 기반으로 평가하면 된다.
다음은 Chunk Layer 를 2개로 하고 Chunk 크기를 2048, 512로 해놓는 코드.
auto_merging_index_0 = build_automerging_index(
    documents,
    llm=OpenAI(model="gpt-3.5-turbo", temperature=0.1),
    embed_model="local:BAAI/bge-small-en-v1.5",
    save_dir="merging_index_0",
    chunk_sizes=[2048,512],
)

auto_merging_engine_0 = get_automerging_query_engine(
    auto_merging_index_0,
    similarity_top_k=12,
    rerank_top_n=6,
)

from utils import get_prebuilt_trulens_recorder

tru_recorder = get_prebuilt_trulens_recorder(
    auto_merging_engine_0,
    app_id ='app_0'
)

eval_questions = []
with open('generated_questions.text', 'r') as file:
    for line in file:
        # Remove newline character and convert to integer
        item = line.strip()
        eval_questions.append(item)

def run_evals(eval_questions, tru_recorder, query_engine):
    for question in eval_questions:
        with tru_recorder as recording:
            response = query_engine.query(question)

run_evals(eval_questions, tru_recorder, auto_merging_engine_0)

from trulens_eval import Tru

Tru().get_leaderboard(app_ids=[])

Tru().run_dashboard()
다음은 여기에 레이어를 하나 더 추가하고 chunk size 를 128 로 설정해서 평가하는 코드임
auto_merging_index_1 = build_automerging_index(
    documents,
    llm=OpenAI(model="gpt-3.5-turbo", temperature=0.1),
    embed_model="local:BAAI/bge-small-en-v1.5",
    save_dir="merging_index_1",
    chunk_sizes=[2048,512,128],
)

auto_merging_engine_1 = get_automerging_query_engine(
    auto_merging_index_1,
    similarity_top_k=12,
    rerank_top_n=6,
)

tru_recorder = get_prebuilt_trulens_recorder(
    auto_merging_engine_1,
    app_id ='app_1'
)

run_evals(eval_questions, tru_recorder, auto_merging_engine_1)

from trulens_eval import Tru

Tru().get_leaderboard(app_ids=[])

Tru().run_dashboard()
5. Conclusion
이 글에서 배운 건 RAG 시스템의 두 기법에 대해서 배워봤고, RAG 시스템을 점진적으로 개선해서 Production Ready 상태로 만드는 방법에 대해서 배워봤음.
RAG 기법에 대해서는 유연한 기법이 필요하다는 생각이 든다.
가장 최적의 기법이라는 건 없고, 문서마다 기법이 다르지 않을까? 라는 생각이 듬.
그래서 Vector Store 에저 뽑아온 Chunk 에 따라서 Metadata 를 보고 어떤 기법을 사용해야 할 지 동적으로 결정해주는 매커니즘이 필요하지 않을까?
분명 작은 Document 라고 한다면 Context Window 에 다 떄려 넣는게 나을 수 있으니까.
'Generative AI' 카테고리의 다른 글
| Functions, Tools and Agents with LangChain (0) | 2024.06.12 |
|---|---|
| What We’ve Learned From A Year of Building with LLMs (0) | 2024.06.11 |
| Fine-tuning Large Language Models (0) | 2024.05.31 |
| Generative AI with LLMs: Week 3 (0) | 2024.05.29 |
| Amazon Bedrock을 이용해 RAG, Fine tuning 없이 자동 고객 응대 서비스 구축하기 (0) | 2024.05.27 |