
이 글은 LLMOps 코스를 보고 정리한 글입니다.
Outline:
- MLOps 에서 하는 일인 머신러닝 어플리케이션을 프로덕션에 배포하기까지의 반복적인 작업을 자동화 하는 것을 LLM 영역에서 하는 걸 배워볼거임.
- LLMOps 를 이용한 End-to-End workflow pipeline 을 구축하는 것을 배워볼거다. (데이터 전처리, Fine-tuning Job 오케스트레이션, 모델 배포 등)
1. The fundamentals
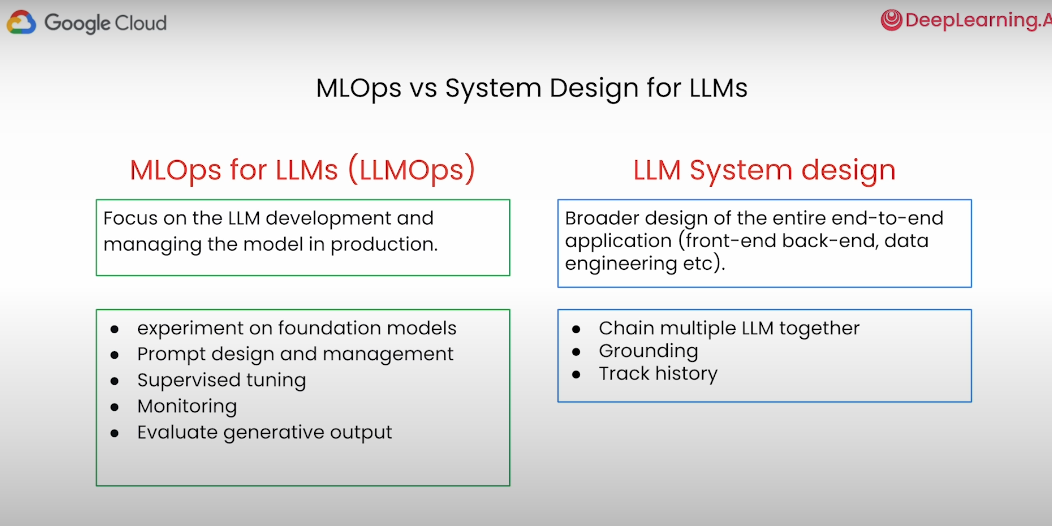
LLMOps의 주요 초점은 LLM(대규모 언어 모델)의 모델 개발과 프로덕션에서 모델을 배포에 관심있다. 주요 작업은 다음과 같음:
- Experiment on foundation models:
- 다양한 LLM의 성능을 실험하고 비교
- 모델을 변경하거나 새로운 모델을 테스트하여 최적의 성능을 찾음.
- Prompt design and management:
- 모델에 제공되는 입력(프롬프트)을 설계하고 관리
- 프롬프트가 모델의 응답 품질에 미치는 영향을 평가하고 조정
- Supervised tuning:
- 레이블된 데이터를 사용하여 모델의 성능을 향상 시킴
- 특정 작업에 대해 모델을 더 잘 맞추기 위해 추가적인 학습을 진행할 수도 있음
- Monitoring:
- 프로덕션 환경에서 모델의 성능을 지속적으로 모니터링함
- 성능 저하나 이상 행동을 감지하고 이를 해결하기 위한 조치를 취한다
- Evaluate generative output
- 모델이 생성하는 출력을 평가하고 개선
- 모델의 응답이 사용자 요구를 충족하는지 확인
LLM 시스템 디자인은 프론트엔드, 백엔드, 데이터 엔지니어링 등 전체 애플리케이션의 광범위하게 다룸:
- Chain multiple LLM together:
- 여러 LLM을 결합하여 복잡한 작업을 수행할 수 있도록 함
- 모델들이 서로 협력하여 더 나은 결과를 도출할 수 있도록 함
- Grounding:
- 모델의 출력을 신뢰할 수 있는 데이터와 연결하여 정확성을 높임
- LLM이 사실 기반의 응답을 제공할 수 있도록 함.
- Track history:
- 사용자와의 상호작용 기록을 추적하여 일관성 있는 응답을 제공함
- 이전 대화나 작업의 문맥을 유지하여 보다 유용한 정보를 제공한다
LLM(대규모 언어 모델) 기반 애플리케이션의 고수준 예제:
- User Input (사용자 입력):
- 사용자가 애플리케이션에 입력을 제공하는 것 예를 들어, 질문을 하거나 명령을 입력할 수 있음
- Final Output (최종 출력):
- LLM의 응답이 가공되어 사용자에게 제공되는 것
- Pre-processing (전처리):
- 사용자의 입력이 LLM에 전달되기 전에 전처리 단계가 있음. 여기서 입력 데이터를 정제하고, 필요한 형식으로 변환
- Grounding (그라운딩)
- 모델의 응답이 신뢰할 수 있도록 데이터를 연결하는 과정. 모델이 사실에 기반한 응답을 제공하도록 도와줌.
- Post-processing & Responsible AI:
- 모델의 응답이 생성된 후, 후처리 단계를 거쳐 최종 출력으로 변환됨.
- Data prep (데이터 준비):
- 모델 학습을 위해 데이터를 준비하는 단계. 데이터 수집, 정제, 가공 등의 작업을 포함한다.
- Tuning (튜닝)
- 모델을 특정 작업에 최적화하기 위해 조정하는 단계임. 하이퍼파라미터 튜닝, 모델 파인튜닝이 포함됨
- Evaluate (평가):
- 모델의 성능을 평가하는 단계임. 학습된 모델이 주어진 작업에서 얼마나 잘 수행하는지 평가한다.

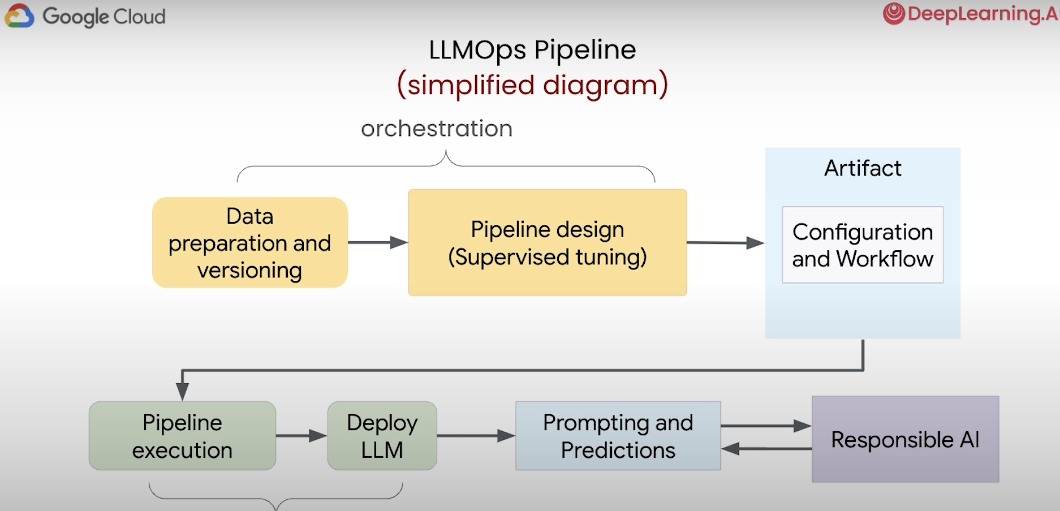
LLMOps 파이프라인:
- Data preparation and versioning (데이터 준비 및 버전 관리):
- 데이터 준비:
- 모델이 사용할 데이터를 수집하고 정제하는 과정
- 데이터의 품질을 높이고 일관성을 유지하기 위해 전처리 작업을 수행한다.
- 버전 관리:
- 데이터의 버전을 관리하여 실험과 모델 학습의 재현성을 보장함.
- 데이터의 변경 이력을 추적하고 필요할 때 이전 버전으로 돌아갈 수 있음.
- 데이터 준비:
- Pipeline design:
- 데이터 준비 단계에서 준비된 데이터를 사용하여 모델 학습 파이프라인을 설계할 수 있음
- 특정 작업에 대해 모델을 최적화하기 위해 지도 학습 방법을 사용할 수 있다.
- Artifact:
- 파이프라인 설계 단계에서 정의된 Configuration 과 Workflow 가 가 Artifact 로 생성됨
- 파이프라인 실행 및 모델 배포에 사용된다.
- Pipeline execution:
- 준비된 구성과 워크플로우를 기반으로 모델 학습 파이프라인을 실행한다.
- Deploy LLM:
- 학습된 모델을 프로덕션 환경에 배포함
- Prompting and Predictions:
- 사용자가 입력한 프롬프트(질문이나 명령)가 모델에 전달됨
- 그리고 모델이 프롬프트에 대한 응답을 생성한다.
2. Data Preparation
Google BigQuery 라는 Data Warehouse 에 있는 Stack Overflow 질문 데이터를 가지고 학습에 사용할 질문 Instruction 데이터를 만들어보자.
먼저 Google BigQuery, Vertex AI 설정하는 코드
from utils import authenticate
credentials, PROJECT_ID = authenticate()

REGION = "us-central1"

import vertexai

vertexai.init(project = PROJECT_ID,
              location = REGION,
              credentials = credentials)
from google.cloud import bigquery
Google BigQuery 에서 데이터 셋을 가지고 오는 코드
import pandas as pd

QUERY = """
SELECT
    CONCAT(q.title, q.body) as input_text,
    a.body AS output_text
FROM
    `bigquery-public-data.stackoverflow.posts_questions` q
JOIN
    `bigquery-public-data.stackoverflow.posts_answers` a
ON
    q.accepted_answer_id = a.id
WHERE
    q.accepted_answer_id IS NOT NULL AND
    REGEXP_CONTAINS(q.tags, "python") AND
    a.creation_date >= "2020-01-01"
LIMIT
    10000
"""

query_job = bq_client.query(QUERY)


### this may take some seconds to run
stack_overflow_df = query_job.result()\
                        .to_arrow()\
                        .to_pandas()

stack_overflow_df.head(2)
Instruction Data set 을 구성하는 코드:
INSTRUCTION_TEMPLATE = f"""\
Please answer the following Stackoverflow question on Python. \
Answer it like you are a developer answering Stackoverflow questions.

Stackoverflow question:
"""

stack_overflow_df['input_text_instruct'] = INSTRUCTION_TEMPLATE + ' '\
    + stack_overflow_df['input_text']


stack_overflow_df['input_text_instruct'][0]
출력 결과는 다음과 같음:
'Please answer the following Stackoverflow question on Python. Answer it like you are a developer answering Stackoverflow questions.\n\nStackoverflow question:\n How to replace the value of multiple cells in multiple rows in a Pytorch tensor?<p>I have a tensor</p>\n<pre><code>import torch\ntorch.zeros((5,10))\n\n>>> tensor([[0., 0., 0., 0., 0., 0., 0., 0., 0., 0.],\n [0., 0., 0., 0., 0., 0., 0., 0., 0., 0.],\n [0., 0., 0., 0., 0., 0., 0., 0., 0., 0.],\n [0., 0., 0., 0., 0., 0., 0., 0., 0., 0.],\n [0., 0., 0., 0., 0., 0., 0., 0., 0., 0.]])\n</code></pre>\n<p>How can I replace the values of X random cells in each row with random inputs (<code>torch.rand()</code>)?</p>\n<p>That is, if <code>X = 2</code>, in each row, 2 random cells should be replaced with <code>torch.rand()</code>.\nSince I need it to not break backpropagation I found <a href="https://stackoverflow.com/questions/53819383/how-to-assign-a-new-value-to-a-pytorch-variable-without-breaking-backpropagation">here</a> that replacing the <code>.data</code> attribute of the cells should work.</p>\n<p>The only familiar thing to me is using a <code>for</code> loop but it\'s not efficient for a large tensor</p>'
sklearn 을 이용해서 데이터 셋을 Test 와 evaluation 으로 분리
from sklearn.model_selection import train_test_split

train, evaluation = train_test_split(
    stack_overflow_df,
    ### test_size=0.2 means 20% for evaluation
    ### which then makes train set to be of 80%
    test_size=0.2,
    random_state=42
)

import datetime

date = datetime.datetime.now().strftime("%H:%d:%m:%Y")

cols = ['input_text_instruct','output_text']
tune_jsonl = train[cols].to_json(orient="records", lines=True)

training_data_filename = f"tune_data_stack_overflow_\
                            python_qa-{date}.jsonl"

with open(training_data_filename, "w") as f:
    f.write(tune_jsonl)
3. Automation and Orchestration with Pipelines
여기서는 Kubeflow 를 이용해서 Pipeline 을 구축해볼거임:
Kubeflow 에 대해서 간단하게 먼저 알아보자.
3.1 Kubeflow
Kubeflow 는 쿠버네티스 위에서 Docker Conatiner 를 활용해서 workflow 를 구축할 수 있는 플랫폼임. 주로 머신러닝과 관련된 job workflow 를 구축할 때 많이 쓰인다.
Kubeflow 로 Pipeline 을 구축할 때는 장점:
- Machine Learning 에서의 end-to-end workflow 를 구축할 ㅜㅅ 있음.
- managing, tracking, visualization 등을 쉽게 할 수 있음.
간단하게 Kubeflow 로 pipeline 을 구축하는 방법
1) pip install kfp 로 의존성 설치해줌
2) Kubeflow 를 이용해서 간단하게 파이프라인을 구축하는 코드 작성
- dsl 모듈은 도메인 특정 언어(Domain-Specific Language) 모듈로 Kubeflow 파이프라인을 정의하는데 사용됨
- @dsl.component 는 파이프라인을 이루는 요소를 뜻하는 애노테이션임. 컴포넌트가 모여서 파이프라인을 구축한다.
- @dsl.pipeline 은 파이프라인 하나를 정의하는 애노테이션임.
from kfp import dsl

@dsl.component
def say_hello(name: str) -> str:
    hello_text = f'Hello, {name}!'
    print(hello_text)
    return hello_text

@dsl.pipeline
def hello_pipeline(recipient: str) -> str:
    hello_task = say_hello(name=recipient)
    return hello_task.output
3) 작성된 파이프라인을 YAML 파일로 컴파일
- kfp 라이브러리의 compiler 를 통해서 파이프라인을 YAML 로 컴파일을 해야지 실행할 수 있음.
from kfp import compiler

compiler.Compiler().compile(hello_pipeline, 'pipeline.yaml')
4) 파이프라인을 실행하는 코드
- kfp.client 의 Client 모듈을 통해서 YAML 로 만든 파이프라인을 제출해서 실행할 수 있음.
from kfp.client import Client

client = Client(host='<MY-KFP-ENDPOINT>')
run = client.create_run_from_pipeline_package(
    'pipeline.yaml',
    arguments={
        'recipient': 'World',
    },
)
파이프라인을 결합해서 end-to-end DAG 를 구축하는 Kubeflow 예제는 다음과 같음:
서브 파이프라인 1: 데이터 준비
from kfp import dsl
from kfp.components import create_component_from_func

@create_component_from_func
def prepare_data() -> str:
    data_path = '/data/prepared_data.csv'
    print(f'Prepared data at {data_path}')
    return data_path

@dsl.pipeline
def data_preparation_pipeline():
    prepare_task = prepare_data()
    return prepare_task.output
서브 파이프라인 2: 모델 훈련
@create_component_from_func
def train_model(data_path: str) -> str:
    model_path = '/models/trained_model.pkl'
    print(f'Trained model saved at {model_path}')
    return model_path

@dsl.pipeline
def training_pipeline(data_path: str):
    train_task = train_model(data_path=data_path)
    return train_task.output
서브 파이프라인 3: 모델 평가
@create_component_from_func
def evaluate_model(model_path: str) -> str:
    evaluation_metrics = 'accuracy: 0.95'
    print(f'Model evaluation metrics: {evaluation_metrics}')
    return evaluation_metrics

@dsl.pipeline
def evaluation_pipeline(model_path: str):
    evaluate_task = evaluate_model(model_path=model_path)
    return evaluate_task.output
메인 파이프라인: 서브 파이프라인 결합
@dsl.pipeline
def end_to_end_pipeline():
    # Step 1: Data Preparation
    data_preparation_task = data_preparation_pipeline()

    # Step 2: Model Training
    training_task = training_pipeline(data_path=data_preparation_task.output)

    # Step 3: Model Evaluation
    evaluation_task = evaluation_pipeline(model_path=training_task.output)

    return evaluation_task.output
파이프라인 컴파일 및 실행
from kfp import compiler
compiler.Compiler().compile(end_to_end_pipeline, 'end_to_end_pipeline.yaml')

from kfp.client import Client
client = Client(host='<MY-KFP-ENDPOINT>')
run = client.create_run_from_pipeline_package(
    'end_to_end_pipeline.yaml',
)
파이프라인 구축할 떄 자주 하는 실수 1) 컴포넌트를 만들 때는 파라미터를 명시해야함:
### Simple example: component 1
@dsl.component
def say_hello(name: str) -> str:
    hello_text = f'Hello, {name}!'

    return hello_text


# 성공
hello_task = say_hello(name="Erwin")

# 실패: name 파라미터를 명시하지 않았기 때문
hello_task = say_hello("Erwin")
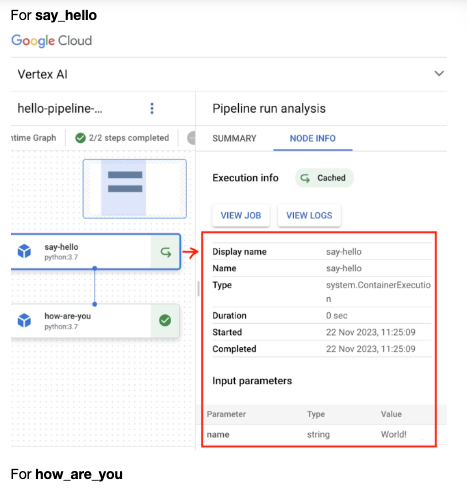
파이프라인 구축할 떄 자주 하는 실수 2) 파이프라인 컴포넌트를 연결할 땐 output 으로 넘겨줘야함.
@dsl.component
def say_hello(name: str) -> str:
    hello_text = f'Hello, {name}!'

    return hello_text


@dsl.component
def how_are_you(hello_text: str) -> str:

    how_are_you = f"{hello_text}. How are you?"

    return how_are_you

# 성공
how_task = how_are_you(hello_text=hello_task.output)

# 실패: hello_task.output 으로 넘겨줘야함
how_task = how_are_you(hello_text=hello_task)
파이프라인 구축할 떄 자주 하는 실수 3) 최종 실행 파이프라인에서는 결과를 output 으로 리턴해야함.
# 성공
@dsl.pipeline
def hello_pipeline(recipient: str) -> str:

    # notice, just recipient and not recipient.output
    hello_task = say_hello(name=recipient)

    # notice .output
    how_task = how_are_you(hello_text=hello_task.output)

    # notice .output
    return how_task.output


# 실패
@dsl.pipeline
def hello_pipeline_with_error(recipient: str) -> str:
    hello_task = say_hello(name=recipient)
    how_task = how_are_you(hello_text=hello_task.output)

    return how_task
    # returning the PipelineTask
Google Cloud Platform 에서 Pipeline 을 실행하는 코드 예시:
compiler.Compiler().compile(hello_pipeline, 'pipeline.yaml')

pipeline_arguments = {
    "recipient": "World!",
}

from google.cloud.aiplatform import PipelineJob

job = PipelineJob(
        ### path of the yaml file to execute
        template_path="pipeline.yaml",
        ### name of the pipeline
        display_name=f"deep_learning_ai_pipeline",
        ### pipeline arguments (inputs)
        ### {"recipient": "World!"} for this example
        parameter_values=pipeline_arguments,
        ### region of execution
        location="us-central1",
        ### root is where temporary files are being
        ### stored by the execution engine
        pipeline_root="./",
)

### submit for execution
job.submit()

### check to see the status of the job
job.state
그럼 이렇게 결과를 볼 수 있다고 함
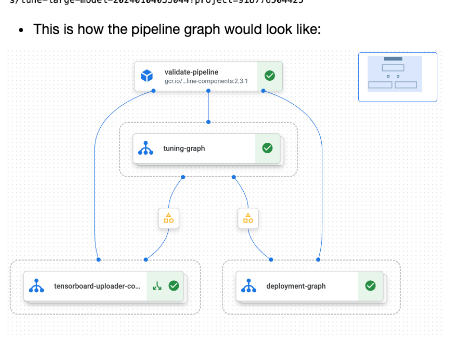
3.2 Kubeflow 를 이용한 이제 실전 예제
LLMOps 에서 사용하기 위한 Kubeflow 파이프라인을 만들어보자.
여기서는 Google 의 Foundation Model 인 PaLM2 를 PEFT (Parameter-Efficient Fine-Tuning) 을 하는 예시를 볼거임.
여기서는 이미 만들어진 Kubeflow 를 재사용해서 효율적으로 파이프라인을 구축해볼거임.
예제 코드는 다음과 같다.
### these are the same
### jsonl files from the previous lab

### time stamps have been removed so that
### the files are consistent for all learners
TRAINING_DATA_URI = "./tune_data_stack_overflow_python_qa.jsonl"
EVAUATION_DATA_URI = "./tune_eval_data_stack_overflow_python_qa.jsonl"

### path to the pipeline file to reuse
### the file is provided in your workspace as well
template_path = 'https://us-kfp.pkg.dev/ml-pipeline/\
large-language-model-pipelines/tune-large-model/v2.0.0'

import datetime

date = datetime.datetime.now().strftime("%H:%d:%m:%Y")

MODEL_NAME = f"deep-learning-ai-model-{date}"

TRAINING_STEPS = 200
EVALUATION_INTERVAL = 20

from utils import authenticate
credentials, PROJECT_ID = authenticate()

REGION = "us-central1"

pipeline_arguments = {
    "model_display_name": MODEL_NAME,
    "location": REGION,
    "large_model_reference": "text-bison@001",
    "project": PROJECT_ID,
    "train_steps": TRAINING_STEPS,
    "dataset_uri": TRAINING_DATA_URI,
    "evaluation_interval": EVALUATION_INTERVAL,
    "evaluation_data_uri": EVAUATION_DATA_URI,
}

pipeline_root "./"

job = PipelineJob(
        ### path of the yaml file to execute
        template_path=template_path,
        ### name of the pipeline
        display_name=f"deep_learning_ai_pipeline-{date}",
        ### pipeline arguments (inputs)
        parameter_values=pipeline_arguments,
        ### region of execution
        location=REGION,
        ### root is where temporary files are being
        ### stored by the execution engine
        pipeline_root=pipeline_root,
        ### enable_caching=True will save the outputs
        ### of components for re-use, and will only re-run those
        ### components for which the code or data has changed.
        enable_caching=True,
)

### submit for execution
job.submit()

### check to see the status of the job
job.state
다음과 같이 실행되는 걸 볼 수 있음.
4. Predictions, Prompts, and Safety
Vertex AI 에 대해서 먼저 알아보자:
- Vertex AI는 Google Cloud에서 제공하는 통합된 머신러닝 플랫폼임.
- 데이터 준비, 모델 훈련, 배포 및 모니터링 등 머신러닝 모델의 전체 수명 주기를 관리하는 데 필요한 도구와 서비스를 제공한다.
Vertex AI의 주요 기능은 다음과 같다:
- 데이터 준비 및 관리:
- Dataset 서비스: 다양한 유형의 데이터셋을 쉽게 관리하고 준비할 수 있음.
- Data Labeling: 데이터 레이블링 서비스로, 머신러닝 모델 훈련에 필요한 레이블링된 데이터를 생성할 수 있음.
- 모델 개발:
- AutoML: 코드 없이도 머신러닝 모델을 자동으로 생성하고 튜닝할 수 있음.
- Custom Training: 커스텀 모델 훈련을 위한 기능으로, 사용자가 직접 정의한 모델을 훈련할 수 있음.
- Pre-built Models: 사전 훈련된 모델을 사용하여 빠르게 시작할 수 있음.
- 모델 배포:
- Model Registry: 모델 버전 관리를 통해 여러 모델 버전을 체계적으로 관리할 수 있음.
- Prediction: REST API를 통해 훈련된 모델을 쉽게 배포하고 예측 요청을 수 있음.
- 모니터링 및 관리:
- Monitoring: 모델 성능 및 서비스 상태를 모니터링하여, 모델의 정확도 및 안정성을 유지할 수 있음
- Explainable AI: 모델의 예측 결과를 설명하고 이해할 수 있는 도구를 제공한다.
Vertex AI 를 이용해서 모델을 가져오고 예측을 하도록 하는 코드
import vertexai
from vertexai.language_models import TextGenerationModel
import random

vertexai.init(project = PROJECT_ID,
              location = REGION,
              credentials = credentials)

model = TextGenerationModel.from_pretrained("text-bison@001")

list_tuned_models = model.list_tuned_model_names()

tuned_model_select = random.choice(list_tuned_models)

deployed_model = TextGenerationModel.get_tuned_model\
(tuned_model_select)

PROMPT = "How can I load a csv file using Pandas?"

response = deployed_model.predict(PROMPT)
pprint 를 이용해서 좀 더 Readable 하게 output 을 읽는 코드 예시:
from pprint import pprint

### load the first object of the response
output = response._prediction_response[0]

### print the first object of the response
pprint(output)
출력 결과는 다음과 같다:
[{'citationMetadata': {'citations': []},
  'content': 'To load a CSV file using Pandas, you can use the `read_csv()` '
             'function. This function takes the path to the CSV file as its '
             'first argument. You can also specify a number of other '
             'arguments, such as the delimiter, the header row, and the index '
             'column.\n'
             '\n'
             'For example, the following code loads the `data.csv` file and '
             'stores it in a DataFrame named `df`:\n'
             '\n'
             '```\n'
             'df = pd.read_csv("data.csv")\n'
             '```\n'
             '\n'
             'You can then access the data in the DataFrame using the `loc()` '
             'and `iloc()` methods.',
  'safetyAttributes': {'blocked': False,
                       'categories': ['Finance',
                                      'Insult',
                                      'Politics',
                                      'Sexual'],
                       'safetyRatings': [{'category': 'Dangerous Content',
                                          'probabilityScore': 0.1,
                                          'severity': 'NEGLIGIBLE',
                                          'severityScore': 0.1},
                                         {'category': 'Harassment',
                                          'probabilityScore': 0.1,
                                          'severity': 'NEGLIGIBLE',
                                          'severityScore': 0.1},
                                         {'category': 'Hate Speech',
                                          'probabilityScore': 0.0,
                                          'severity': 'NEGLIGIBLE',
                                          'severityScore': 0.1},
                                         {'category': 'Sexually Explicit',
                                          'probabilityScore': 0.1,
                                          'severity': 'NEGLIGIBLE',
                                          'severityScore': 0.0}],
                       'scores': [0.6, 0.1, 0.2, 0.1]}}]
Prompt 를 이용해서 모델이 예측을 하도록 하는 코드
INSTRUCTION = """\
Please answer the following Stackoverflow question on Python.\
Answer it like\
you are a developer answering Stackoverflow questions.\
Question:
"""

QUESTION = "How can I store my TensorFlow checkpoint on\
Google Cloud Storage? Python example?"

PROMPT = f"""
{INSTRUCTION} {QUESTION}
"""

final_response = deployed_model.predict(PROMPT)

output = final_response._prediction_response[0][0]["content"]

print(output)
output 출력 결과:
To store your TensorFlow checkpoint on Google Cloud Storage, you can use the `tf.io.gfile.GFile` class. This class provides a way to read and write files to Google Cloud Storage.

To save a checkpoint to Google Cloud Storage, you can use the following code:

```python
import tensorflow as tf
from tensorflow.io import gfile

# Create a checkpoint directory in Google Cloud Storage.
checkpoint_dir = gfile.GFile('gs://my-bucket/my-checkpoint-dir', 'w')

# Save the checkpoint to Google
PROMPT 는 이렇게 구성될거임:
Please answer the following Stackoverflow question on Python.Answer it likeyou are a developer answering Stackoverflow questions.Question:
 How can I store my TensorFlow checkpoint onGoogle Cloud Storage? Python example?
Vertex AI 모델에서 Safety Score 와 차단 여부를 확인하는 코드
### retrieve the "blocked" key from the
### "safetyAttributes" of the response
blocked = response._prediction_response[0][0]\
['safetyAttributes']['blocked']

# True or False 로 응답 나올거임
print(blocked)

### retrieve the "safetyAttributes" of the response
safety_attributes = response._prediction_response[0][0]\
['safetyAttributes']

pprint(safety_attributes)
safety_attributes 출력 결과는 다음과 같다:
{'blocked': False,
 'categories': ['Finance', 'Insult', 'Politics', 'Sexual'],
 'safetyRatings': [{'category': 'Dangerous Content',
                    'probabilityScore': 0.1,
                    'severity': 'NEGLIGIBLE',
                    'severityScore': 0.1},
                   {'category': 'Harassment',
                    'probabilityScore': 0.1,
                    'severity': 'NEGLIGIBLE',
                    'severityScore': 0.1},
                   {'category': 'Hate Speech',
                    'probabilityScore': 0.0,
                    'severity': 'NEGLIGIBLE',
                    'severityScore': 0.1},
                   {'category': 'Sexually Explicit',
                    'probabilityScore': 0.1,
                    'severity': 'NEGLIGIBLE',
                    'severityScore': 0.0}],
Vertex AI 에서는 LLM 의 출력이 원본 컨텐츠를 기반으로 출력을 헀는지 볼 수 있는 citations 점수도 볼 수 있음.
만약 인용된 정보가 있다면 출력될거고, 없다면 빈 리스트로 반환될거임.
### retrieve the "citations" key from the
### "citationMetadata" of the response
citation = response._prediction_response[0][0]\
['citationMetadata']['citations']

pprint(citation)
Conclusion
MLOps 에서 사용하는 개념과 도구들을 LLMOps 에서는 많이 인용해서 사용한다.
- Google BigQuery 를 이용한 데이터 전처리, 데이터 웨어하우스
- Kubeflow 를 이용한 파이프라인 구축
- Vertex AI 를 이용한 모델 예측 작업
그렇게 큰 차이는 없는듯
'Generative AI' 카테고리의 다른 글
| Notion 에서 AI 프로덕트를 개발하는 방법 (0) | 2024.07.13 |
|---|---|
| Beyond RAG: Scaling long context (0) | 2024.06.21 |
| Domain-specific LLMs (0) | 2024.06.20 |
| METAGPT: META PROGRAMMING FOR AMULTI-AGENT COLLABORATIVE FRAMEWORK (0) | 2024.06.20 |
| Building Agentic RAG with Llamaindex (0) | 2024.06.20 |